 |
Blogger Tutorial for Beginners
Blogger is a service that allows users to publish single or multi-user blogs. You can open your own blog/site very easily and without cost. This Blogger Tutorial is just a try to give you a complete knowledge Step by Step.In this tutorial, we will learn all basics and primary knowledge about Google's Blogger to create our blog and get success.
Introduction
Blogger, also known as Blogspot, is a blog-publishing service platform owned by Google where users can create a blog for free. It was created for the people who can make a blog without writing a single line of code.
I will teach you about blogger in * Steps
- Create a Website
- Add descriptions and customize settings
- Apply a responsive custom template
- Setup google analytics
- Setup Google search console
- Write high-quality posts
- Create social media pages to promote your blog
- Do On-page and Off-page SEO
- Achieve Google rankings
- Become the king of blogging
- Last words
Create A Website
Sign up with your Google account. Now write your name in the name section and click save.
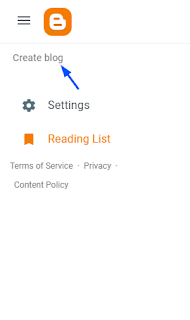
If you already signed up and didn't created a blog then click on create a blog.
If you already have few blogs then click on the drop-down where the current site name appears and click create a new blog. (As Shown in image)
Now Choose the name you want to give your blog like tasty food, silly cars or something else then Add "|" and tell what your blog is about then click next.
Nowadays finding the best Domain Name on Blogspot is not so easy that's why you need to search much to find the best one for you. when you choose the best domain name for your site then click "Save".
Congratulations first step has been done your site is created! Now we have to move on to the next step!
Add Descriptions And Customize Settings
After creating a blog the next most important step is to add the description of your website and customise the Settings(SEO, Date and Post Settings etc.)
Open your blogger dashboard and click to settings (Shown in image)
Now Click on Description Button:Now add the detailed description of your site so people know what your site is about! after writing the description Copy this description and click "Save".Scroll down to post settings.
You can set the number of posts to show on the home page and if you want anything which will appear in your dashboard when you writes a new post then add that component in-post template. (Shown in Image)
Scroll down to comments settings
Set the comment location where you want to show the comment section
For example, if you want to show the comment section after the post then select embedded.
if want to show comments section on a separate page then select full page!
You can set who can comment on your posts (Anonymous, Users with Google account or just your team members)
You can also turn on or off comment moderation.
If you want to show a message to people who are going to comment then add that message in comment form message and save.
Scroll down to formatting
Here you can set the time zone of your blog (View Image)
The next is Search description
Turn on the Search description then paste the description you copied at first and click save (As Shown in image)
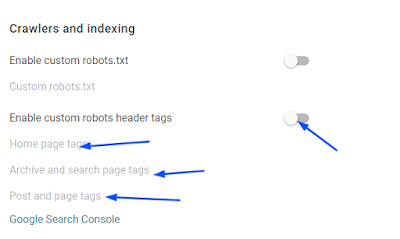
Scroll down and here you will find Crawlers and Indexing
Enable custom robot header tags
Click on home page tags and check (all, noodp)Click on Archive And Search Page Tags and Check (noindex, noodp)
Click on post and page tags and check (all, noodp)
and click save
Congratulations second section of this Blogger tutorial is completed now we successfully created a blog and customised it at our own
Now it's time to move on to the next section do you know the next section is much interesting for us!
Header Image Designed by Slides go from free pik
Apply A Responsive Custom Theme
Do you know what a website visitor likes the most? He likes the design of a website. If your site's design is good then visitors will stay and read your posts But, if the design is worst they will immediately click the back button.
You can design your website for free using Free blogger templates
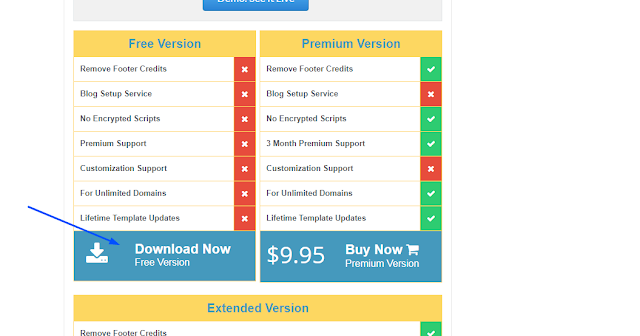
Go to Sora Templates Or Templates Yard to choose best blogger theme for your blog and download that template.
After downloading you need to scroll down and click on documentation button
On the documentation page, you will get brief information on How to install a Blogger template. and also you can customise your blog using this documentation.
When you are done installing and customizing your blogger template then the next part is to install google analytics in blogger.
Why you Trust on this Blogger Tutorial?
You need to trust in this blogger Tutorial Because...
- I have spent more than 10 hours on writing this!
- I have learned all this in a period of 2 years!
- And this Blogger Tutorial is 100% Trustworthy for you!
Header Image Designed by Slides go from free pik
Changelog
6 March 2020: Initial Publish
7 March 2020: Added Quick Navigation and Improved Grammar
17 March 2020: Added Quick Navigation Tables,Added Blogger Stats Section Updated Grammer
18 March 2020: Improved grammar Updated Stats section And Improved Quality and added Pages,earnings and comments section
14 April 2020: Added Layout Tab section,Improved headings and table of contents
8 August 2020: Removed all unreadable sections
30 October 2020: Added "Create a Website" Section
31 October 2020 : Added "Customise Settings" Section
3 november 2020: Added: "Apply Responsive Theme" Section


4 Comments
Nice article,so helpful
ReplyDeleteResponsive Blogger Template - Download premium version free
Thanks for your review!
DeleteGreat Article 🧡
ReplyDeleteBlogger Template, M R Laboratory
Good guidance keep it up
ReplyDeleteDownload Premium Blogger Template And More Interesting Premium Content For Free
https://www.protheme24x7.eu.org